


Form tab
A standard form defined for a given type of document appears in the tab. In some types of documents (e.g. documents or assortment), a predefined form can be attached to a document type. The forms are defined by the option Settings: Personalization: Forms. A defined form is indicated by selecting its name from the drop-down menu (important: the form must be defined earlier). After selecting the form, the content of the tab changes, instead of the standard form there are items from the defined form. At this point, you can start the form configuration. The primary one is setting the behaviour of individual form elements.
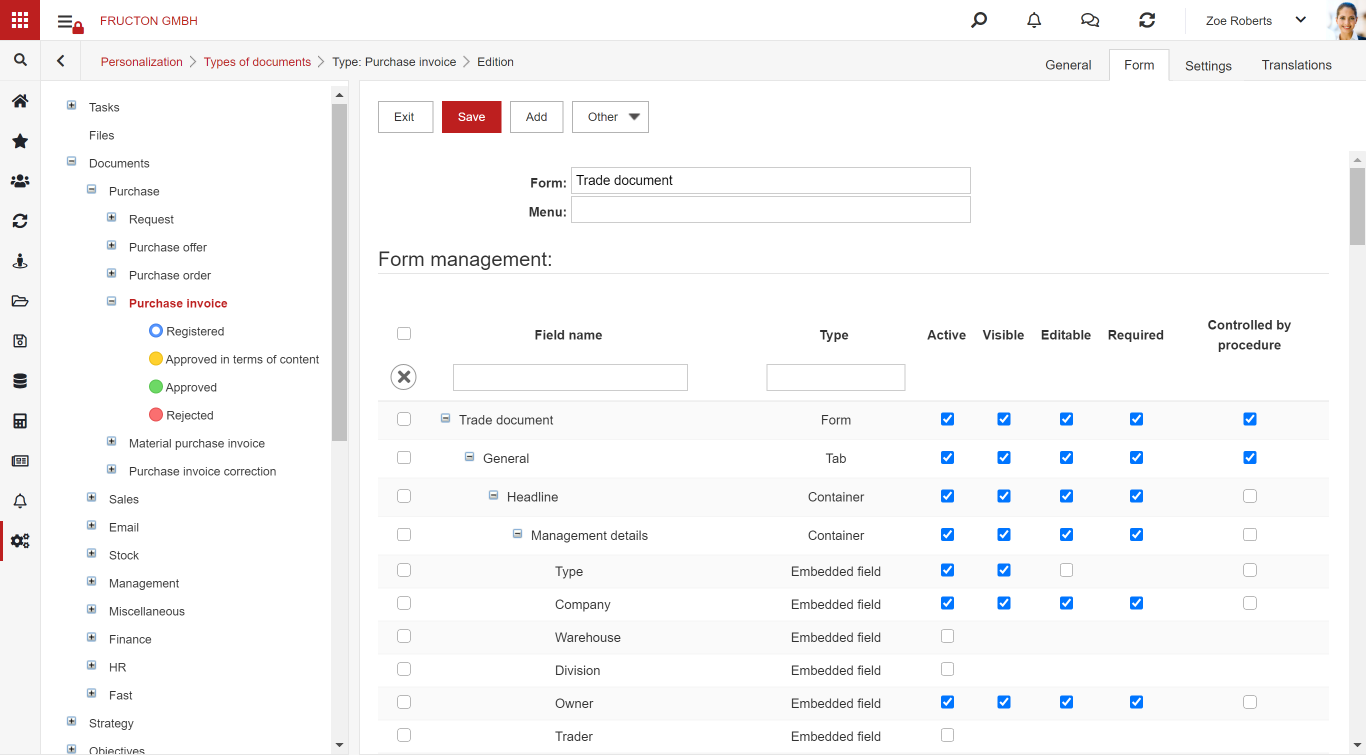
You have five options to choose from:
Active – the element is active, i.e. it will be accessible in a document created on the basis of the document type but it will not be visible to user who creates or edits the document.
Visible – the item is visible on the form.
Editable – it is possible to edit a given element.
Required – Adding value to the item is required. Without filling in the data, the form cannot be saved.
Controlled by procedure – the behaviour of the form depends on the workflow procedure. The indicated elements will behave differently (be visible / invisible, required / not required, etc.) depending on which step of the workflow (procedure) the document is.
Additionally, you can edit each of the objects (lines, fields) of the form, specifying their appearance and behaviour using CSS styles. After selecting this option, a window with the form editor opens.
Dedicated form views
It is possible to prepare an individual view of the form for a given type of document. For this purpose, a Dedicated form view should be created

Name of view– Any text
Edit this view – Opens a window where you can mark which elements will be changed. There are only three options to choose from: Default setting, i.e. leaving the element as it is on the form, Visible, i.e. changing the visibility of the element and Editing, i.e. changing the possibility of editing the element.
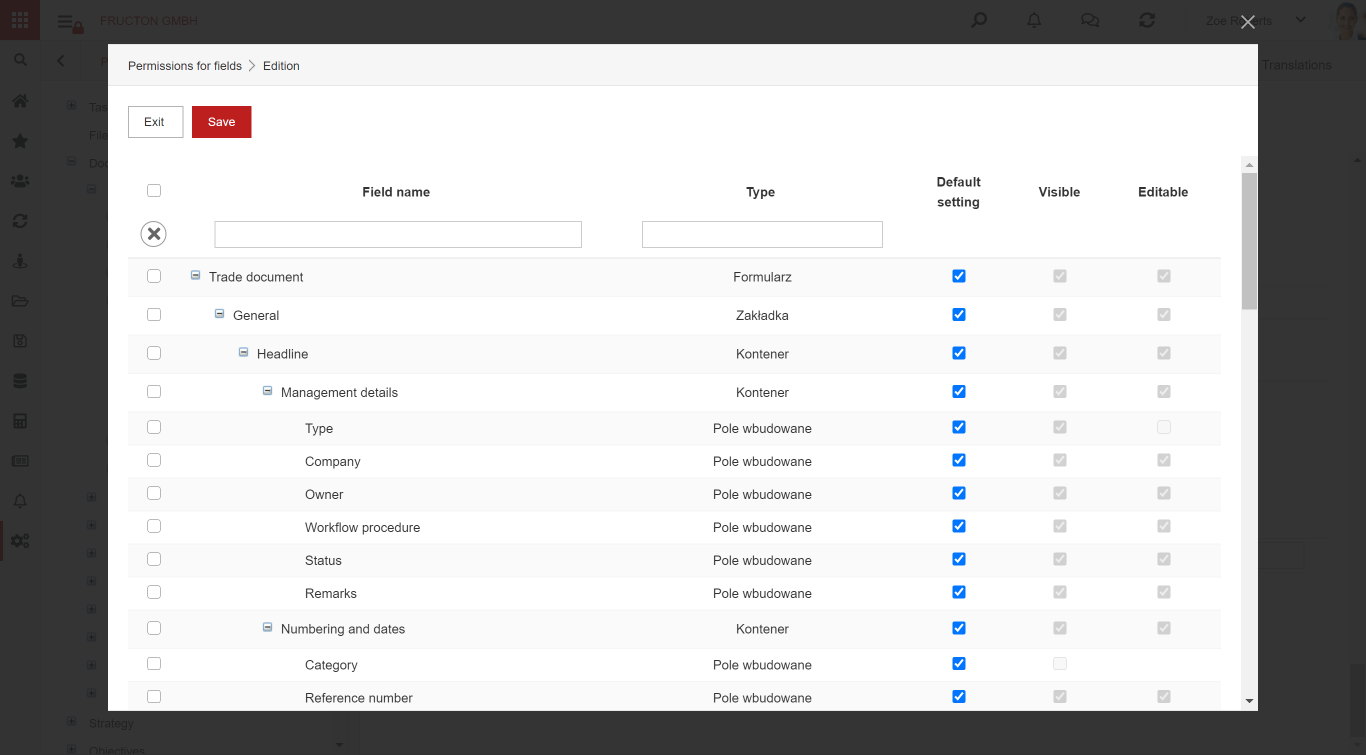
Note: the element must be active on the form to be able to include it when creating a dedicated view.
Delete this view – deletes the view.
Move Up and Move Down – organize the order of views.
View for the following units – here you can indicate who will see the view. You can choose an organizational structure, group or a specific user.
Settings tab
Basic settings

Blocking editing above status
This option controls the ability to edit the document. A document in circulation (workflow) with the status selected in this option cannot be edited.
Archiving above status
This option allows you to control the possibility of archiving a document. A document in circulation (workflow) with a status lower than the status selected in this option may not be transferred to the archive.
Automatic replenishment of the document owner
If this option is set to “yes”, the person adding the document will automatically become the owner of the document.
Permissions for the owner of the document:
Specifies the permissions for the document owner
Permissions for the supervisor of the document owner
Permissions for the supervisor of the owner of the document
The default currency for the document
Specifies the default currency of the document.

Correction
Correction, document search
Specifies the field to search for documents for correction
The default module
Here you can indicate the default module to which new documents will be sent.
Sorting attachments
Specifies how attachments are sorted: oldest at the bottom or oldest at the top of the list.
Type of history record
Define how to save the history of changes in the document. There are three options:
- Standard save– The entry for the modification appears only when the person making the modification changes
- After each document saving – each modification of the document is recorded in the system
- No save– no modifications are recorded in the system
Hide the left side
The left side (attachments panel) will be invisible in detail mode and edit mode.
Items

Assortment outside the file
The option determines whether the possibility of entering data into the directory (dictionary) should be narrowed down. Selecting “yes” will allow the user to enter any product which will then be added to the dictionary. Selecting “no” will allow the user to only select a product from a predefined directory.
Filter the range
Selecting this option will allow you to narrow down the assortment to the selected categories. Categories are selected from the dictionary after clicking on the selection window.
Load the price
This option allows you to choose which price category will be automatically loaded from the assortment dictionary.
Allow updating prices on the card
If the user introducing the assortment has the appropriate permissions and the option is set to “yes”, then the person introducing the assortment can change the price of the assortment from the document level. The entered price becomes the new price of the given assortment in the file.
Loading discounts
This option allows you to load discounts from the assortment dictionary. This option is used when preparing offers and sales invoices for customers. Possible options:
- Automatic – the discount will be loaded when saving the document
- Manual – the user can load a discount by selecting the appropriate option (“Load discount”). Discounts are not added automatically.
- Unavailable– discounts cannot be loaded.
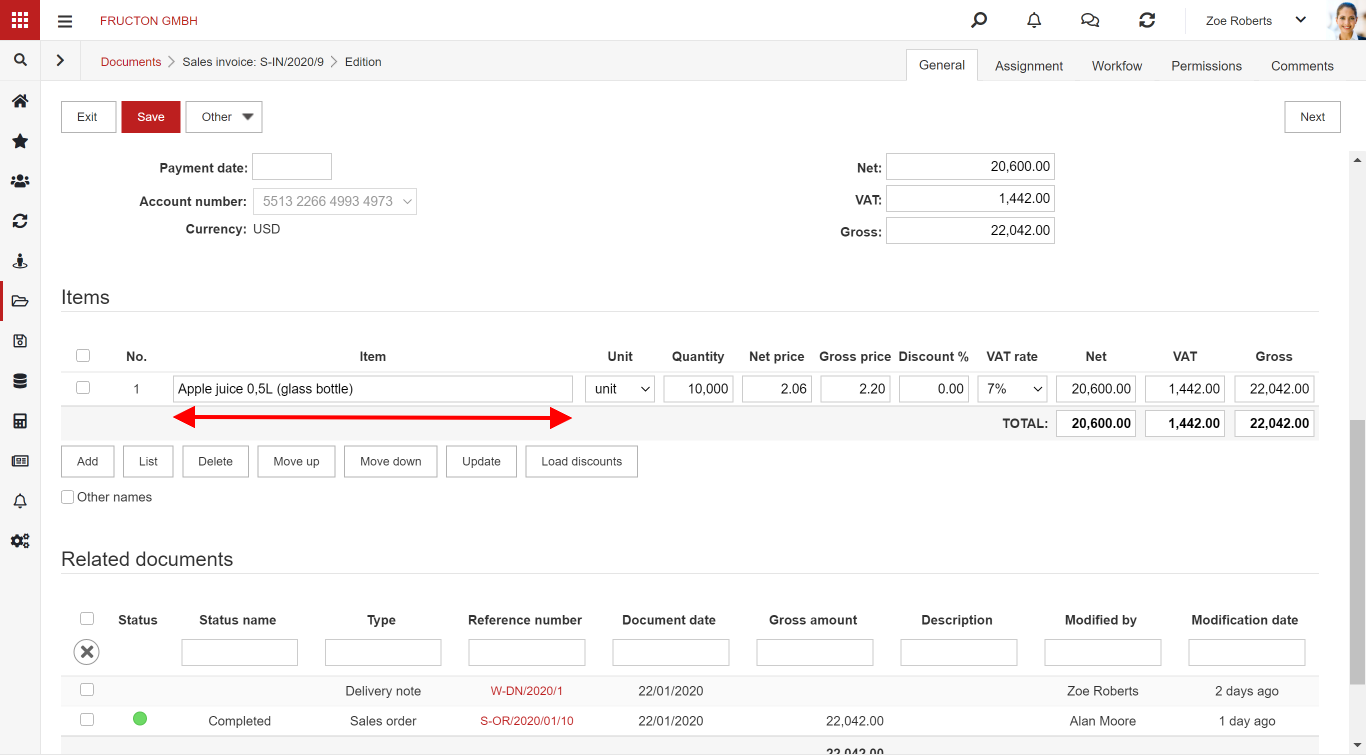
The width of the assortment
Specifies the width of the assortment column. In the document editing form, setting this parameter will refer to this element:
The method of conversion
Method of converting values in elements. There are three options:
- From prices – after selecting this option, enter the prices for quantity and VAT and the system will calculate the sums
- From sums – enter the total value, quantity and VAT and the system will calculate the prices
- From prices and sums – you can enter any data starting from the unit price or the value and the system will calculate the missing value.
The option of disable conversion
After selecting this option, you will be able to select “turn off recalculation” on the document. If the user selects this option on the document, the system will stop recalculating the values in the document. All amounts, including gross, net, and VAT will have to be entered manually. The system will not check the correctness of these values.
VAT status
 Check the VAT status by
After selecting this option, the system checks the contractor’s VAT status according to the selected date on the document. Checking takes place via the website provided by the Ministry of Finance.
Automatic VAT status check
After selecting this option, the system automatically checks the VAT status of the contractor added to the document. If the Checking VAT status by field is not set, the VAT status will not be checked regardless of the setting of this field
Checking for older than
After selecting this option, the system will check the VAT status of the contractor added to the document if more than X days have passed since the last check, where X is the value entered in this option.
Payments
 Begin for payment
After selecting the “yes” option, the document will be automatically added to the payment plan.
Default planned payment type
In this field, select the type of document that will correspond to the planned payment.
Default payment direction
In this option, you can select the default payment direction for the selected document type. There are inflow, outflow and net to choose from.
Default Payment Entity
In this option you can select the default payment entity.
Default payment amount
In this option, you can define a default payment amount (gross, net, from the assignment).
Balance the payment with the gross amount
After selecting “yes” in this option, the system automatically checks if the sum of payments is equal to the gross amount from the document.
Contractor
 Default contractor type
The option sets the default type of contractor. It is used when you add a new contractor via the document e.g. invoice.
Default contractor category
The option sets the default contractor category It is used when you add a new contractor via the document (e.g. invoice).
The default prefix for the tax identification number
Defines the default prefix for the tax identification number.
Completing the contractor on the basis of the Central Statistical Office:
After selecting “yes”, the system completes the contractor’s data with data downloaded from the Central Statistical Office database.
Reference number scheme
Set own identification number according to the scheme – determines whether the system is to automatically assign the own number of the document according to the scheme.
Document symbol – here you can enter the document symbol. The document number will look like this:
Reference number as attachment name – reference number would be used as attachment name
Separator – a symbol which will be placed betwen parts of reference number. By default the symbol / is used.
The document number will look like this:
{First part} / {Second part} / {Third part} / {Fourth part} / {Fifth part}

Each of the part can take one of the following values:
- Document symbol
- Number with zeros, e.g. 001
- Edit. If you choose the edit option, the user may enter his own number; if you choose an option without edit the system imposes subsequent numbers.
- A number without zeros, e.g. 1
- Edit. If you choose the edit option, the user may enter his own number; if you choose an option without edit the system imposes subsequent numbers.
- Month
- Date of document
- Date of event
- Date of receiving
- User initials
- Calendar year (yyyy) – (e. g. 2019)
- Date of document
- Date of event
- Date of receiving
- Calendar year (yy) – (e. g. 19)
- Date of document
- Date of event
- Date of receiving
- Contractor code
- Document category code
- Company code
- Department code
Transformations
![]() This option allows you to define actions in the system, which allow to create dependent documents based on the source document, e.g. based on an invoice, it is possible to prepare a goods receipt or a correcting invoice. After generating the document, data and items from the base document will be copied automatically. Possible options:
This option allows you to define actions in the system, which allow to create dependent documents based on the source document, e.g. based on an invoice, it is possible to prepare a goods receipt or a correcting invoice. After generating the document, data and items from the base document will be copied automatically. Possible options:
Possible transformations / category – allows you to add additional derivative documents.
Document type – indication of the type of document (e.g. correcting invoice) which is to be created after conversion.
Category – what category will the newly created document go to.
Consolidation options
- Summing up items, no assignment consolidation
- Rewriting items, rewriting assignment for items
- Adding elements, adding assignment by elements
- Adding assignments, summing up assignments without using elements
- Breaking down elements according to the recipe
Copy attachments – setting the option to “yes” will copy the attachments to the derivative document.
OCR
OCR engine
This option allows you to select the OCR tool used in the system. Two options are possible:
- Google – with less possibilities, free.
- Abbyy – with greater possibilities, if you select this option, you need an additional paid license.
- BN – advanced OCR engine used with the AI component.
Prints
 This option allows you to define printouts of documents created in the system. The printout will add an attachment to the document in the format defined in the printout definition. Options available:
Name – name of the printout
Link – path to the report definition defined in reporting services. Report can be changed with Report Builder.
For many – whether the printout is available for multiple selected documents.
Default – whether the printout is the default for the document.
Print format – printout format for a given printout. If you select the “everyone” option, a print preview will be generated in the browser, which can then be saved or printed directly on the printer.
Print format
Default print format. If the printout format is not defined for any of the printouts, then this option is checked.
Generating a printout for a status
This option allows you to define an action that will automatically generate a printout when the document receives the status indicated in this option.
Contractor on the printout
Indication of the contractor whose data is to appear on the printout.
Set the file name based on the report
If set to yes it allows you to name of the printouts to the name of the report on which the printout is based.
Buttons

Bookkeeping
 This option allows you to define an automatic mechanism that generates a assignment for a document. Options available:
Default log– the log where the accounting records will appear.
Default log status – the status of the log entries in the log.
Default accounting scheme
Default VAT register
The default status of the VAT document
The default VAT date
Default date of operation
Assignment

This option allows you to define the document assignment scheme. Dictionaries that will be used for assignment should be defined on the form by selecting activity in the appropriate place (section assignment).
Select dictionaries for which relations are to be included in the assignment
Lets you limit dictionaries to relationships between selected items. For example, if the assignment takes place for the cost centre and the employee and we select both of these dictionaries in this option, then when performing document assignment, when you select the cost centre, the employee dictionary will be limited to those employees who are associated with the selected cost centre.
Default value:
Choice of default value: gross, net, other.
Decree by elements by default:
After selecting the “yes” option, the system will automatically generate a document, taking into account all elements from the document.
Allow currency assignments
Selecting “yes” allow to create assignment in the currency of the document other than main currency.
By default, account in document currency
Substitutions
 To be able to use substitutions on a form where substitutions are set, the substitution controls, the start date and the end date must be active.
Does the document type participate in substitutions:
After selecting “yes”, the system will check whether there is an active replacement, that is, whether the document which is the replacement has the correct status and the appropriate date range. If the conditions are met, the system will automatically transfer the task in workflow to a designated substitute.
The option appears on all document types that do not have an active replacement control.
Statuses for which there is a substitution
In this field, you should define the status of the document that you use to define the substitutions for the substitutions to take effect. If this field is left blank, substitutions will not be active.
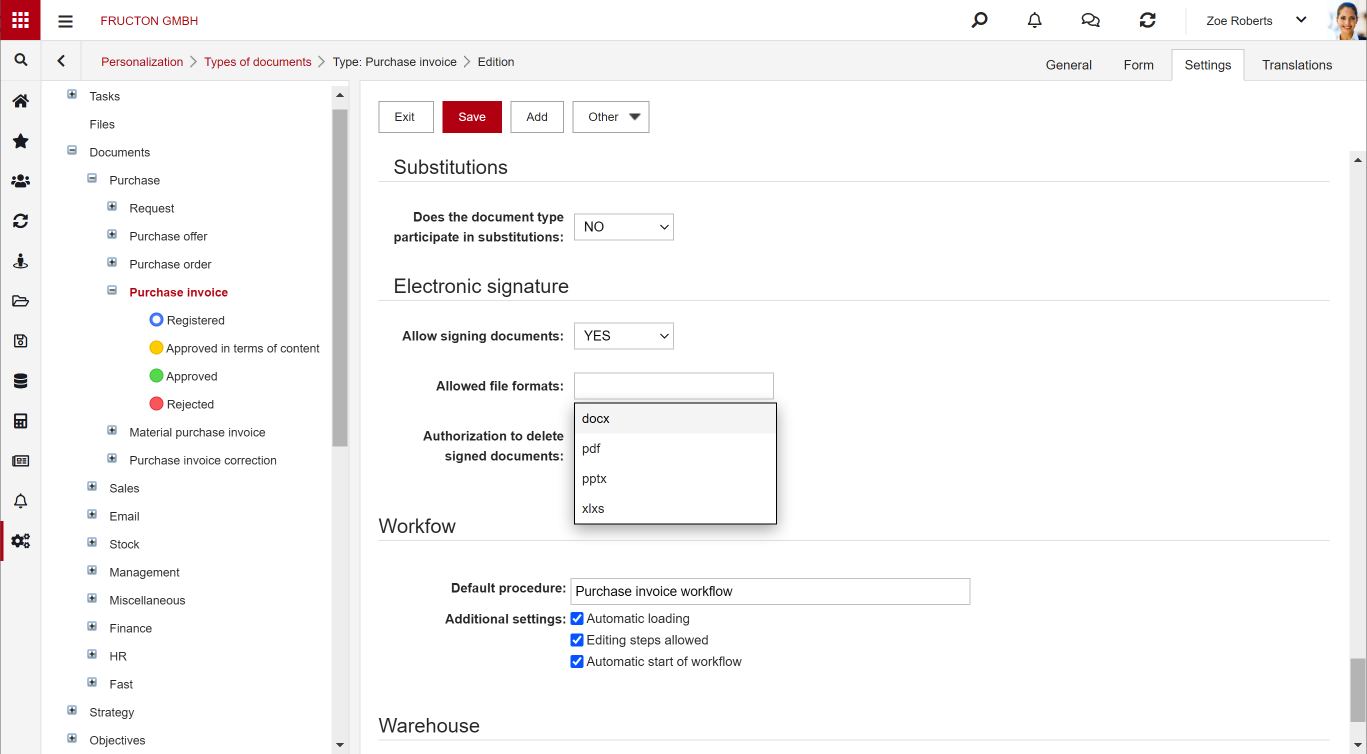
Digital signature
Allow signing documents
If you select “yes” on document, in the attachment panel will appear an option to sign an attachment. Note that only some type of files can by sign.
Allowed file formats
Here you can select which type of file can by signed. You can only sign a Microsoft Office documents and PDF documents.
Authorization to delete signed documents:
Here you can specify who can delete the signed document.

No choice – none has privileges to delete signed attachment.
All – all users, who have privileges to modify document can delete an attachment.
Owner – only the owner of the document can delete attachment.
Workflow executor – only the person, who at the moment is an executor of the workflow can delete the attachment.
Workflow
 This option allows you to associate the document with the default workflow (procedure). Each document that will be created on the basis of this type of document will be processed in the system in accordance with the defined workflow.
Available options:
Default procedure – allows you to indicate the workflow assigned to a given document. Note: the workflow must be created earlier and assigned to a given type of document. This means that the procedure for creating a new document type with workflow is as follows:
- Create a new document type
- Create a new workflow (in Settings: Personalization: Procedures)
- Assigning a document type to the workflow
- If the default procedure for the selected document option is selected when defining the workflow, the workflow will be automatically assigned to the document type. If not, you must additionally assign the workflow to the document type
Additional settings
Automatic loading – the workflow procedure will be automatically loaded into the newly created document. If the default procedure is selected and automatic circulation start is set to yes, despite setting this option to no, the default procedure will be loaded and started.
Allowed edition of steps – during the workflow, from the document level, it is possible to edit workflow steps
Automatic workflow start – After creating the document, the workflow is started automatically.
Warehouse
Way of document receipt in the stock:
The parameter determines how the document affects the warehouse. Possible parameters:
- “Select” – the document does not affect the warehouse
- A document that add items to the warehouse
- A document that retrieve items from the warehouse
- A document that transfer items between the warehouse